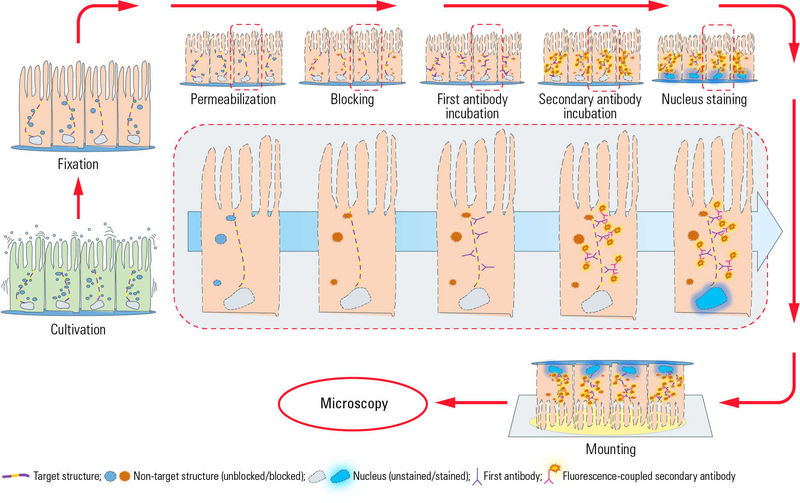
Immunofluorescence labelling protocol
This protocol is intended as a guide - there are several different ways to fix, permeabilse, block, stain etc your samples, and many protocols online.

Image credit: Leica Microsystems
Protocol:
Plate cells to glass coverslips at least 6 hours before fixation, preferably overnight. Cells should be at ~40-60% confluency at time of fixation.
(Tip: 13mm round glass coverslips fit nicely into the wells of a 24-well plate.)
Check cells have adhered to glass and are at approximate correct confluency.
Fix cells using 4% PFA/PBS – 15 mins, room temperature.
(Tip: Fixatives crosslink proteins in your samples, preventing movement of proteins, organelles and cells, rendering the cells ‘dead’. Try not to let the cells dry out at any time during this process, especially not this one! It might be worth doing one coverslip at a time; remove the supernatant and then gently add the fixative to the side of the well until immersing the coverslip.)
Quench fixative with 15mM glycine / PBS – 2x 5min washes.
Glycine will bind to any free aldehyde groups that remain from your fixatives. Without this step the free aldehydes would likely fix your antibodies during the staining process.
Permeabilise cells with 0.1% saponin / PBS – 10mins strict!
In order to get the antibodies in to intracellular compartments we need to permeabilise the membranes. There are lots of different detergents that we use to create holes in membranes (digitonin, triton etc) but saponin is regarded as the gentlest). (Saponin from quillaja bark – Sigma). If you have trouble permeabilising the cells, consider using Triton-x100 – protocols widely available online.
Block your samples with 1% BSA / 0.01% saponin / PBS – 15mins.
The blocking solution enhances the efficiency of your labelling. The BSA is a mixture of proteins that will bind to anything in your samples that are inherently ‘sticky’ towards antibodies. Without this blocking step, your antibodies are likely to bind non-specifically to lots of antigens in your sample. The blocking step will also ‘block’ some real, specific binding of your antibodies – but this doesn’t matter as your real signal-to-noise ratio will be much better as the low affinity (non-specific) binding will be much reduced.
(Tip: Note that 0.01% saponin remains in this mixture – without the addition of some saponin, the holes created during permeabilisation will re-seal. The 0.01% saponin is enough to prevent these holes from re-sealing, but not enough to create more damage to the sample.)
Dilute your primary antibody or antibodies in blocking solution (1% BSA/0.01% saponin/PBS). You will want ~20ul per coverslip.
This step may require some optimisation as you will need to work out what dilution to use for each antibody. As a general rule, antibody dilutions for IF tend to be around 1/200.
If using multiple primary antibodies, make sure that these antibodies are raised in different species!
Cut a strip of parafilm and stick it to the bench. Pipette ~20ul drops on to the parafilm in the same order that you have your coverslips in the 24-well plate. Remember to leave a little room between each drop.
Use a pair of forceps to pick up the coverslips from the well of the 24-well plate. You might find a 10ul tip is useful to help pick them out of the well. Pick the coverslip up and invert it on to the antibody drop (cell side down on to the drops of primary antibody). Once you have done all of the coverslips, cover with the lid of the 24-well plate or some plastic to stop evaporation from occurring. Add a small piece of damp tissue if required. Leave for 1 hour.
This puts the coverslip cell-side-down and so the antibodies can get in to your sample and bind to their antigen.
Pick up your coverslip, invert again to put the coverslip cell-side up, and put back in the 24-well plate. Wash with blocking solution, 3mins x3.
This will help remove any low affinity antibody binding.
Dilute your secondary antibodies in blocking solution. Remember to check the species of your primary antibody corresponds to the secondary you are using! (e.g. anti-mouse for mouse monoclonal antibodies).You will require ~20ul per coverslip.
(Tip: Most fluorescent secondary antibodies are used at 1/200. ThermoFisher have a range of good secondaries with various fluorescent groups.)
Again, invert your coverslips to drops of diluted secondary antibody. Cover and protect from light. Leave for ~45mins.
Pick up your coverslip, invert again to put the coverslip cell-side up, and put back in the 24-well plate. Wash with blocking solution, 3mins x3.
(Tip: During this time, get the mounting media out of the freezer.)
Label glass slides and then add ~5ul mounting media per coverslip. Be careful not to use too much - the mounting media is very viscous!
Wash coverslips briefly with water for a few seconds before wicking off excess water with filter paper, inverting coverslip so it is cell-side down and placing over drop of mounting media.
(Tip: Leave on flat surface and cover to protect from light. Image once set.)

